
Mobmania is a bullet-hell action game (like Vampire Survivors) in which you survive for 20 minutes while defeating enemie rush from around you.
Mobmania has a high-difficulty achievement “Jingle! Jingle!”
You can unlock this achievement by completing the game with “Jester” selected for your trinket.
The effect of “Jester” is
・Instant death when taking damage
Therefore, if you take damage even once, you will be defeated.
In addition, you lose if you take damage to your shields, not just health damage.
To unlock this achievement, defeat the final boss without taking any damage.
Characters
In order to unlock this achievement, the character must have the following abilities:
・Fast movement speed, easy to keep distance from enemies.
・Can deal high damage from long range.
・Can always deal with fast-moving enemies that appear after a 45-second count.
・Can defeat boss enemies quickly.
In short, if you take damage even once, you will be defeated, so it is important to have a high-speed, high-damage long-range attack.
As a character that satisfies these abilities, I recommend “Tony”.
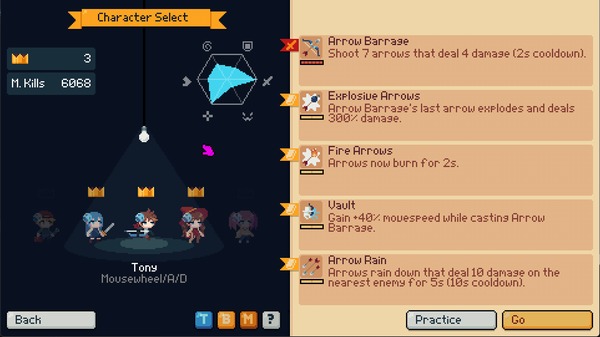
His signature weapon “Arrow Barrage” can deal high damage at long range. In addition, his skills “Explosive Arrows” and “Fire Arrows” can add area damage and damage over time.
Also, his skill “Vault” allows him to move quickly.
Finally, “Arrow Rain” deals high damage over a wide area, creating a safe area to keep enemies out.
Trinkets
You need to equip the “Jester” to unlock the achievement.
Badges
You don’t have to equip the badge, but it makes unlocking achievements easier.
My recommend badge is:
“XP Finder”:Highly recommended
XP does not vanish.
You don’t have to go pick up XP right away.
“Skill Mastery”:Highly recommended
Start with rank 1 skills.
A powerful badge that can strengthen weak characters in the early stages. You can reduce the consumption of the number of level ups and avoid the misfortune of not appearing in the equipment selection options.
“Lucky Day”
Increases the reroll count by 7 times.
It becomes easier to obtain the equipment you want when you level up.
“Anger Isuues”, “Bottled Up” and “Forever Alone”
A badge that gives additional effects when equipped with the common upgrade “Mask” (damage +2, damage to boss enemies +15%, ignores terrain).
Since you shouldn’t take damage even once, you can ignore the downside of “Mask”‘s reduced defense and increase the damage. Therefore, you can increase the good effect you get when you get “Mask”.
In addition, badges that increase damage, increase size, and increase movement speed are also recommended.
Maps
The map to choose is “Darkwood”.
There are three reasons to choose “Darkwood”
・No rush boss enemy.
・You can use one more weapon enhancement device than other maps.
・Simple stage tricks.
The biggest problem with unlocking this achievement is the rush boss enemy.
For example,
・”Pengu” in “Forest”.
・”Teeth” in “The Deep”.
・”Bedrock” is the worst map. Never choose.
These boss enemies cannot be defeated with no damage unless stunned or knocked back. Therefore, the luck of the build to align the equipment is also required.
In “Darkwood”, there are no rush boss enemies, so you can complete the stage relatively stably.
However, it is necessary to practice in order to defeat the long-range attack boss enemy without taking damage.
Common Weapons
We recommend using common weapons that have long-range attacks, wide-range attacks, and stun effects.
Weapons are also recommended below.
Highly recommended
“![]() Camera” “
Camera” “![]() Cards” “
Cards” “![]() Missiles”
Missiles”
These weapons have high damage, long-range attacks, and wide-range attacks, and are useful in any situation.
I recommend to get maximum rank”Missiles” , which is effective against the final boss enemy “witch”.
Recommended
“![]() Petals” “
Petals” “![]() Tracking Rockets”
Tracking Rockets”
These weapons have high damage, long range attacks, and wide range attacks.
“![]() Blocks”
Blocks”
You can always deal with a group of fast-moving enemies that appear after a 45-second count.
Weapons attack round chara
“![]() Manga” “
Manga” “![]() YoYo”
YoYo”
Not recommended.
This is because the weapon effects that surround you make it harder to notice enemies approaching you.
It would be nice if these weapons would always kill the enemy, but they don’t.
You may get hit by an enemy that has passed through and take damage.
Other weapons
You shouldn’t take melee weapons such as “![]() Dagger” and “
Dagger” and “![]() Scythe” because you need to get close to the enemy.
Scythe” because you need to get close to the enemy.
“![]() Boxing Gloves” and “
Boxing Gloves” and “![]() Baseball Bat” which have a knockback effect, are not recommended as they can hit enemies moved by the knockback.
Baseball Bat” which have a knockback effect, are not recommended as they can hit enemies moved by the knockback.
For weapons other than the above, it is better not to choose them due to their low performance.
Common Equips
It is recommended that you acquire common upgrades that increase damage, size, and movement speed.
Highly recommended
“Mask”
As mentioned above, you will only get the advantage of increasing attack power, ignoring the disadvantage of lower defense power.
“Sneaker”
Movement speed is the same as survivability. It is not necessary in the early stage, but it is recommended to always set the rank to MAX after the middle stage.
Recommended
“Glasses” “Dice”
You can increase your total damage. You have no choice but to take it.
“Weight”
Although there is a disadvantage that the critical damage is reduced, the overall damage dealt is higher because the base damage is increased.
“Balloon”
Increase equipment size. It will be advantageous in attacking the boss enemy from the range attack of the small enemy.
“Elixir”
Increases the amount of experience gained. Take it when you can afford it.
“Magnet”
Increases XP and item acquisition range. Rank 0 is fine, so if you keep it, it will be stable.
My Play Through
The image below is the first time I won with the Jester equipped.
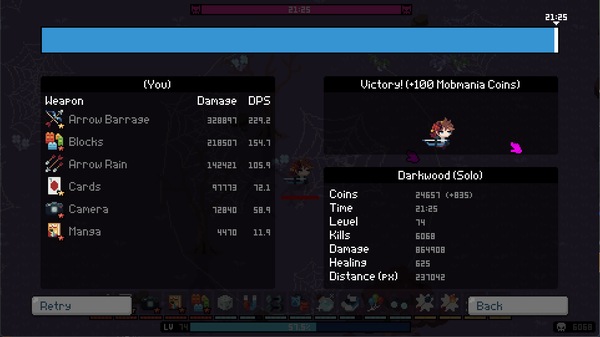
Used Weapons and Equips
“![]() Blocks”
Blocks”
I took it to defeat a small enemy that comes at the 45-second count.
It did more damage than I expected.
“![]() Cards” and “
Cards” and “![]() Camera”
Camera”
The damage dealt is low because I didn’t get these weapons in early stage. But I like these wepons.
“![]() Manga”
Manga”
I took it because I thought it might be effective against enemies who were using it. However, I should not have taken it because visibility became poor.
Besides, I wanted to get “![]() Missiles” for the last witch fight.
Missiles” for the last witch fight.
アップグレードについては、上述でおすすめしたものを取っています。
Used Badges
I did not have a good badge when I won this time.
I was equipped with “XP Finder” and “Lucky Day” and the rest were badges of increasing size.
XP Finder” is a useful badge that I can’t remove at any time.
Summary
The “Jestrer” achievement is one of the most difficult achievements in the Steam statistics, with an acquisition rate of less than 1%.
I tried many times to practice how to move and how to defeat each boss enemy, and finally managed to unlock it with some luck in equipment selection.
Not that the method in this article is the best, but I do recommend it as one way to unlock achievements!
コメント
Thanks to you
I got last Achievement!
Thank you